
Common Mistakes When Installing Vinyl Plank Flooring: 8 Powerful Fixes You Must Know
Vinyl plank flooring is one of the most popular choices for homeowners who want durability, beauty, and easy installation all in one. But even though it’s considered a beginner-friendly flooring option, many people make small yet costly errors during installation. These Common Mistakes When Installing Vinyl Plank Flooring can lead to issues like uneven surfaces, gaps, lifting corners, and short product life. The good news is that all these problems can be avoided with the right knowledge and approach.
Before you start laying those planks, it’s important to understand the proper techniques and common pitfalls. In this guide, we’ll explore the Common Mistakes When Installing Vinyl Plank Flooring and share 8 powerful fixes used by professionals to ensure smooth, long-lasting results. Whether you’re doing a DIY project or supervising an installation, these expert-backed solutions will help you avoid frustration and achieve the perfect finish.
Why skipping acclimation ruins your floor
Skipping the acclimation process is one of the biggest Common Mistakes When Installing Vinyl Plank Flooring that can completely ruin your results. When you install the planks straight out of the box without letting them adjust to your room’s temperature and humidity, they may expand or contract after installation. This leads to buckling, gaps, or lifted edges over time. Acclimation allows the vinyl planks to settle and adapt to the room environment, ensuring stability and a smooth, long-lasting finish. Always let the planks rest for at least 48 hours before installation to avoid costly repairs later.
Fix: Let your vinyl planks acclimate in the room for 48–72 hours before installation. Keep them in unopened boxes and maintain normal room temperature. This simple step ensures your flooring stays stable and free from gaps or warping.
How to prepare your subfloor properly
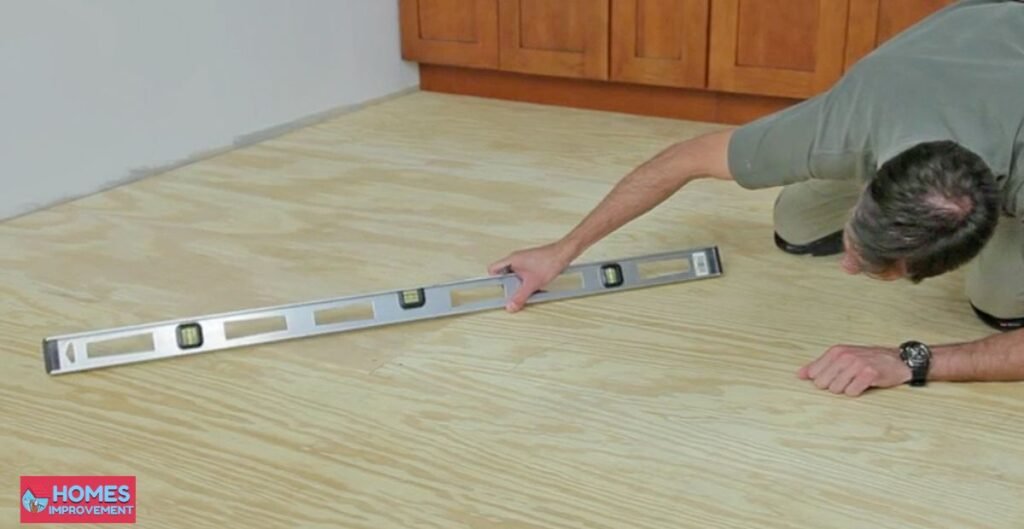
One of the Common Mistakes When Installing Vinyl Plank Flooring is ignoring subfloor preparation. An uneven or dirty surface can cause planks to shift, squeak, or develop gaps over time. Always start by cleaning the subfloor thoroughly and ensuring it’s smooth and level. Even small debris or rough spots can prevent proper adhesion and lead to long-term flooring damage. For concrete subfloors, make sure they’re dry and moisture-free before laying the planks. A well-prepared subfloor ensures your vinyl flooring looks flawless and lasts longer without costly repairs. Learn more about proper subfloor preparation on our home improvement guide.
Fix: Use a leveling compound to even out dips or bumps, vacuum the surface to remove dirt and dust, and check for moisture using a hygrometer. A clean, flat subfloor is the foundation of a perfect vinyl installation.
Why expansion gaps are critical and how to size them
One of the Common Mistakes When Installing Vinyl Plank Flooring is ignoring the need for expansion gaps. Vinyl planks expand and contract due to changes in temperature and humidity. Without proper gaps, the flooring can buckle, lift, or form uneven seams over time. An expansion gap allows your planks to move freely without causing damage to the floor or walls. It’s a small step, but crucial for the long-term stability and appearance of your vinyl flooring. Most experts recommend leaving at least a ¼-inch space around the room’s edges, including doorways, pipes, and corners. This gap is later hidden by baseboards or molding, giving a seamless finish while preventing future issues.
Fix: Leave a ¼-inch expansion gap on all sides of the floor. Use spacers during installation to maintain even spacing, and never install planks tightly against walls or fixed objects.
How to plan layout to avoid awkward cuts
Another one of the Common Mistakes When Installing Vinyl Plank Flooring is rushing into installation without a proper layout plan. Poor planning often leads to narrow or awkwardly cut planks along walls, corners, or doorways, which can make your floor look uneven and unprofessional. Before laying the first plank, measure your room’s width and length to determine how many full planks you’ll fit across. Adjust your layout so that both the first and last rows are at least half a plank wide. Also, stagger your seams between rows to create a natural, visually balanced pattern. A well-planned layout not only enhances the room’s aesthetic but also reduces waste and frustration during installation.
Fix: Dry-lay a few rows before actual installation to preview the layout. Adjust plank width and staggering to minimize small cuts and ensure a professional finish throughout the room.
Cuts, door frames & how to avoid mishaps
One of the Common Mistakes When Installing Vinyl Plank Flooring is failing to handle door frames and tricky cuts correctly. Many DIY installers cut planks unevenly or force them under door jambs, leading to visible gaps or cracked edges. The best approach is to remove door trim before installation and undercut the frame slightly so the vinyl planks can slide beneath it smoothly. Use a fine-tooth saw for cleaner edges and always measure twice before cutting. Taking your time with precise cuts around frames, corners, and vents ensures a snug, professional-looking finish that lasts.
Fix: Undercut door frames instead of forcing planks beneath them. Use a contour gauge or cardboard template for precise cuts and avoid rushing these detailed areas.
Choosing adhesive & using underlayment correctly
A common oversight among beginners and even pros in Common Mistakes When Installing Vinyl Plank Flooring is selecting the wrong adhesive or skipping underlayment altogether. The right adhesive depends on your subfloor type and the plank’s locking system. Using a low-quality or incompatible glue can cause lifting or bubbling over time. Similarly, underlayment plays a vital role in noise reduction, moisture protection, and providing a smoother surface. Failing to use the proper underlayment can lead to uneven flooring and reduced comfort underfoot. Always follow the manufacturer’s recommendations for both adhesive and underlayment to ensure maximum performance and longevity. For detailed guidance on choosing the right adhesive and underlayment, visit Armstrong Flooring.
Fix: Use high-quality, recommended adhesive for your plank type. Add a moisture-resistant underlayment to enhance durability and comfort while preventing squeaks and surface irregularities.
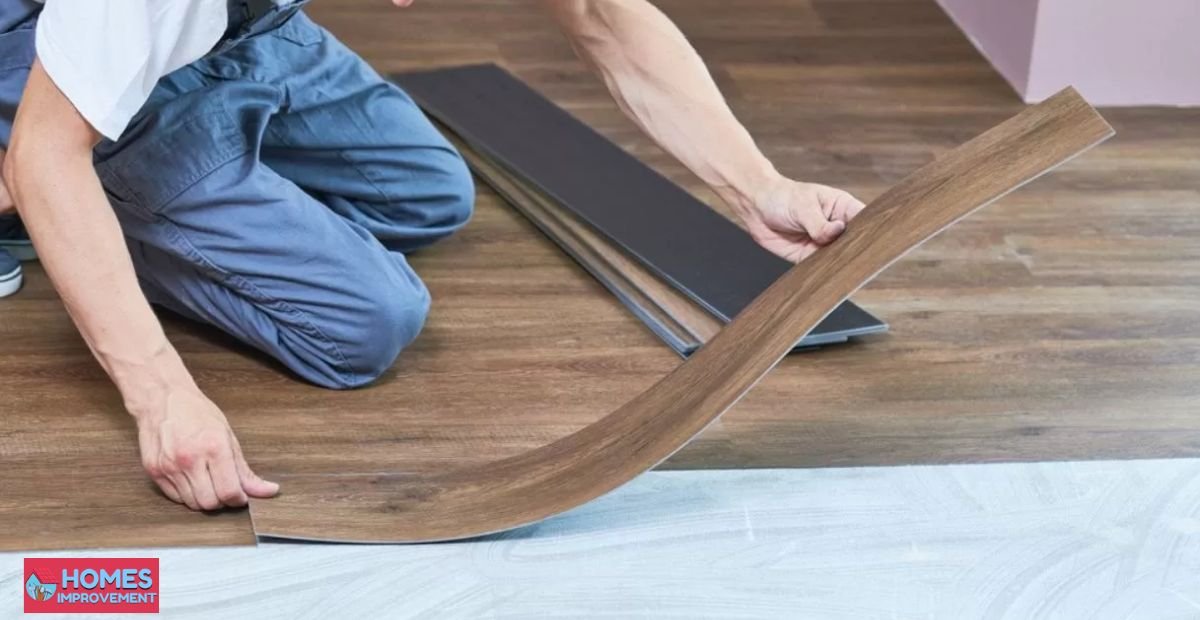
Why forcing planks leads to broken locks
One of the Common Mistakes When Installing Vinyl Plank Flooring is forcing planks into place instead of allowing them to click naturally. Many installers rush the process, using excessive force or improper tools, which can damage the locking edges. Broken locks make it difficult to secure planks properly, leading to gaps and instability in the flooring. Forcing planks also increases the risk of cracking or chipping along seams, compromising both appearance and durability. Proper alignment and gentle handling are essential to avoid these issues. Taking your time ensures a cleaner finish and prolongs the life of your vinyl flooring.
Fix: Align planks carefully before locking them in place. Use a tapping block and rubber mallet to gently secure connections, avoiding excessive force that can damage edges and locking mechanisms.
Don’t ignore moisture — the silent floor killer
One of the biggest yet overlooked Common Mistakes When Installing Vinyl Plank Flooring is ignoring moisture issues. Moisture can seep from concrete subfloors or enter from high-humidity environments, leading to warping, mold growth, and adhesive failure over time. Even minor moisture problems can significantly shorten the life of your vinyl flooring. Many installers skip moisture testing before installation, which can result in costly repairs later. Proper preparation and prevention are key to ensuring a durable and beautiful floor. Always check moisture levels and address any dampness before proceeding. Learn more about moisture testing techniques here.
Fix: Test the subfloor for moisture using a hygrometer or moisture meter. Use a vapor barrier or moisture-resistant underlayment if needed. For high-humidity spaces, maintain controlled climate conditions to protect your flooring from damage.
Conclusion
When you install vinyl plank flooring well, it feels simple. The hardest job is avoiding the Common Mistakes When Installing Vinyl Plank Flooring that often appear in search queries like “why floor gaps,” “why won’t planks lock,” or “how much expansion gap.” Acclimation, subfloor prep, layout planning, correct adhesive, gap allowance, careful cuts, and moisture control—the eight fixes above—bring your installation from risky to reliable. Take your time, follow best practices, and your floor will last beautifully for years. For more flooring tips, check this expert guide.
FAQs
How long should vinyl planks acclimate before installation?
Let the planks sit in the room, in their boxes, for at least 48 hours. This lets them adapt to the temperature and humidity of that specific space, reducing later movement that causes gaps or buckling.
Can I install vinyl plank over an old tile or hardwood floor?
Yes, if the existing surface is flat, stable, and smooth. Repair dents or uneven spots first and make sure the surface is clean. You may need a leveling compound or underlayment to ensure a premium finish.
What is the recommended expansion gap width?
Experts commonly use a ¼-inch (6 mm) expansion space around all edges and fixed barriers. This allows vinyl to expand and contract without pressing against walls and buckling.
Which adhesive is best for vinyl plank flooring?
Always use the adhesive type recommended by the manufacturer—usually pressure-sensitive or polyurethane. Match the correct trowel notch, use even application, and work in small sections to avoid premature drying.
How do I prevent moisture problems under vinyl plank flooring?
Test the slab for moisture before starting. Use vapor barriers or moisture-resistant underlayments. Keep ambient humidity controlled. Especially in basements, dry it thoroughly before installing to avoid warping or mold.